I recently wrote this and am sharring it with you now.
A railroad runs through it.
An exploration of building models from paper.
As I write this I am riding the Amtrak “Cardinal” across West Virginia. I’m on my way to share my knowledge in computer modeling as an instructor at Villanova.
Model building is a large part of my life, weather in an untouchable, digital form or as a physical form that exists in our day to day 3d, touchable reality.
Looking out the window I see every kind of structure imaginable. The ideas for things to build are overwhelming. Again and again it is proven to me that there must be a prototype of every conceivable thing some where in the world no matter how unlikely.
For the last several years I have been one of the two people behind Clever models, A company that has made modeling in paper / cardstock its focus. It’s not purely eccentricity that motivates me to this material. Paper is an old material. It’s comfortable and friendly, even warm to the touch. It’s surprisingly strong, At least as strong as wood. Modelers assume wood is stronger due to its dimensional solidity but I would argue that its woods brittleness that is its weakness. Paper (which is wood in its high tech composite form) is pliable but with high tensile strength. It forms much like sheet metal. It starts as a sheet or roll but start folding it and it becomes rigid.
Paper as a modeling material has been a hard sell. Some modelers just can’t see it as a viable substance to do the heavy lifting of model making. Sure, papers fine for a tarpaper roof or an awning, perhaps a sign or two but not for a steel bridge. Well, I’m challenging that. I like to think the people in our hobby are an adventurous and open minded lot. We have a lot of converts. Fantastic craftsman / artists who have grasped and run with the discovery of paper modeling.
We believe the Clever models make great models. Not great paper models, great models. Any one can use our techniques to model just about anything.
Case studies:
John Cosma, “The Gypsy trolley” is a striking model railroad. At 16’ and growing in length, it keeps its width to a slim 10” except for the turnarounds at each end. John is an artist. His eye for what looks right and his skill for creating scenes that tell stories is un surpassed. Why this railroad has not been featured in all of the MR magazines, I don’t know. I do know that it is a perennial hit at the annual “Train fest” in Milwaukee WI.
At one of the biggest train shows in the Midwest, the Gypsy trolley, packs them in 3 deep all weekend. John, usually wearing a bowler hat, fields questions and compliments with equal style.
I first met John at this train show and was so impressed by his model that I had to compliment him. Quite as an aside I had noticed that tucked inside his engine house there was a paper tram car. Not in the least obvious for its construction it just fit the scene and looked “right”. That was my opening and reason to accost the gentleman. I first engaged the charming lady who was also behind the layout as she was not thronged with model geek admirers.
I introduced my self to Chris and mentioned how much I liked the layout and especially the little paper tram car hidden in the engine house. On meeting John I gave him one of our early card stock kits as an appreciation for his artistry, thanked him and went on my way.
John got it. He saw the strength of paper as a modeling material and embraced to a degree that shocked me. He built the kit and found a place for it on his layout. I was honored. It didn’t stop there. He sent ideas for a kit complete with photos. I made the kit and sent him a prototype. It was a model of a switch tower that already existed as a scratch build on his layout. The next time I saw the gypsy trolley, John had replaced his tower with ours.
Since that time John has created many other buildings for his layout to the point that it is now mostly paper with two new modules that are entirely populated with cardstock structures. I keep pushing him to launch his own line of kits but at least for now he allows us to release some of his models as kits.
John Cosma is a good friend and perhaps someday a competitor.
Jim Gore: Jim is a master modeler in any media. He’s been published regularly and is active as a clinician around the Florida coast. I have never met Jim but as a regular customer for our materials he would actively correspond via our web blog.
Around this time, my brother and I were beginning to look for a way to distribute our kits digitally as user printable files. Printing and packaging out kits and textures was paralyzing us as a company and sucking up all the time that I wanted to devote to designing new kits. As a somewhat misguided idea I had recreated, as a kit the Gorre and Daphetid , enginehouse and its companion water tower. The kit was beautiful and HUGE. It was far too big and complex to ever release as a preprinted kit. No one would pay the $130 it would cost, for a “paper” kit. Then Jim accidentally came to the rescue.
Jim had asked about the G&D engine house he had read about in the blog. When would it be available? He really wanted to build this monster. I had to tell him that I didn’t think we would ever release it but I was willing to send him the image files under the condition that he print it, build it and document the build. My thought at the time was that I could use this as a test of our digital file distribution and quality control for home printed kits.
Jim dove in printing out the 60 plus image files and dutifully reporting back his experiences. Because of his work we added a lot of extras and fixed a few flaws. His feedback and pictures were so good that we decided the “Engine house at Gorre” would be our first kit released digitally on CD. We made 50 of them and they sold out almost immediately. All thanks to the effort of Jim Gore, master modeler.
Dave Frary: needs no introduction. One of the pillars of contemporary model railroading and the author of more “how to’s” than you can count. Dave is a professional modeler. He created layouts and displays for individuals and museums.
My brother Dave and I went to the first CSS show “Craftsman scale structure show”
in Mansfield Mass. We wanted to establish and make claim to being a “Craftsman” model kit manufacturer. Into the lions den. To say we were a bit intimidated is an understatement. The modelers and manufacturers there were the best of the best and we were those odd Midwestern fellas making kits from paper.
Dave, as a professional, saw a practical use for our texture sheets. He saw that he could use our products to fill the inevitable gaps created by the lack of time or budget without sacrificing a quality appearance. We don’t know if he’s built any of our kits yet but he’s been vocal and supportive of what we are doing and uses our texture sheets.
We had a great experience at CSS. We learned a lot from the modelers and other manufacturers. It made our kits better by raising the bar and in the end we were accepted as one of the group.
The brass tacks
What does it take to create a cardstock model and why do it.
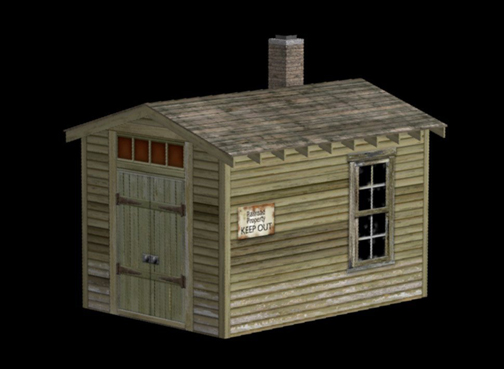
The first and strongest reason to use paper is its printability. The wood grain in miniature wood looks terrible. It seems most of the time the grain is ignored and ultimately hurts the finished models appearance. Plastic can be painted to look quite good…if you happen to be a master painter. Digital photography and printing transforms paper. Paper doesn’t have much of a surface texture on it’s own. It becomes what ever image is printed on it. Too flat? Layer, fold, burnish or emboss it. No one is saying it should stay flat. On the contrary all of our structures use several layers. You can ever create a board on board approach cutting out each individual plank and shingle. When we create a kit, we try to make them challenging but not hard to put together for the average modeler. In the hands of an experienced builder however the material really shows its strength. Going the extra step and adding that extra layer pays off and if you want to go even farther print off more and kit bash away. What about those pesky white edges. The white edge that is revealed when you cut a part out of cardstock turns some folks off. Dealing with the white edges is just part of the process and a small one at that. Some people go through a great deal of effort to find matching paint colors for the retouching of the edges. I recommend something simpler. A medium gray marker, two actually, a warm gray for stone and brick a cool gray for metals. Taking the cut out part, quickly brush it along the edge of the nib of a gray marker. Don’t be too careful or too slow as the marker ink will aggressively absorb into the edge of the paper. Your goal here is to knock down the pure whiteness of the paper. Also I find it helps to work from the back of the part to help avoid mishaps on the printed surface.
Thin and small parts:
Some modelers get intimidated by small or thin parts. Myself included. It might be counter intuitive but things like thin metal frame works, beams and wood framing looks great in paper. Just as a thin wood part might splinter or crack, a paper part that’s thin can tear, especially if the modeler is using a less than sharp blade. There are techniques to make this easier. Step one to avoid this is use a fresh blade. When cutting out a fine detail in paper say a window mullion or steel frame work, cut out the inside negative space first. (see illust) this allows the part to be supported by the surrounding paper. The outside edge is much easier to cut and should be done last. As a rule of thumb, do the hard stuff first. Inside corners like window frames can be tough with blades often going too far and cutting a part in two. First, this is not a disaster. If the cut is clean you can re attach the pieces but here’s a way to help avoid that all together. Take a straight pin and pierce the corners of the part. This gives the blade a starting and more importantly a stopping point for your cuts. The idea is to create a pilot hole like you would when using a jig saw. It releases the stress in the corners caused by the pressure of cutting. So, a little work with a pin will really sharpen up your corners. Ok, really thin parts. Here’s a cheat. Use the very thin CA (super glue) just a drop and saturate the part before cutting. After that it’s technically not paper anymore. You’ve turned it into a composite more like fiberglass. The resulting part will be cutable, drillable and even sandable.
To fold or not to fold…
Papers elasticity and springiness make small tight folds difficult. Think corner moldings, steel I beams etc. a thin piece of paper tends to want to stay flat. Say your cutting a corner molding that when folded will be 16th” wide. When you first cut the part from the sheet, leave as much surrounding paper as you can. Once again this extra paper will add support to the part to be folded. Using a straight edge, score the fold line indicated and make the fold. I like to use the dull side of an exacto blade to crush the paper in the fold. This gives a real tight result. After the fold is made cut away the extra support paper. Ok that’s one way. Most of the experienced modelers don’t do that. They cut the part in two retouch the white paper edges and glue the strips to the corner with an overlap edge just the way it would be done in the real full size world using wood. A little extra cutting but it looks good and works every time.
Too shiny?
One comment we have gotten is that printed paper looks too shiny. What, your styrene isn’t. Yes ink even on matt paper is a bit shiny. Never said it wasn’t, that’s why there’s dull coat and matt varnish. Besides the solution to the too shiny problem ( really people work with me here) a dull coat spray, there are several good ones from testors, tamaya, and krylon to name thee, also seals and protects the paper from moisture, the Bain of all things porous even wood. You must seal the paper. You have invested time and money on your model don’t just hope it doesn’t get wet.
Spraying your model with a UV protective dull coat has another advantage. The UV screening qualities filters stray light and makes the printed details really pop. Models just come alive with that last spray.
On the dimensionality of brick:
The hard truth is, no one, not even us makes a perfect brick. Cast bricks, not scale. Injection molded, too regular. Laser engraved wood, Oh please, nothing like a too regular, out of scale brick with fuzzy edges. The truth is that lacking something better, the same guy that will count rivets on a loco’s firebox and grouse about the rivet size will praise the cast bricks with 3” deep mortar grooves. Modelers have evolved a taste for gross scale when it comes the structure materials. The scale surface details of most brick can’t or isn’t reproduced.
We get asked constantly if our brick papers are embossed. They are not. We made a choice early on to go with materials that looked right and we suffer the criticism that it’s too flat. All things taken into consideration, out flat paper is closer to scale than any cast, cut or embossed brick product.
Being too smooth is a legitimate gripe but there are remedies you can use to heighten the appearance of printed brick. First very few brick walls are flat. They usually have raised decorative courses, inset stone ornaments and raised reinforcements across them.
(see illust) By adding one or two additional layers of brick paper to these areas you fool the eye into accepting that all of the brick is dimensional. It doesn’t take much at all. A very slight change in surface depth will do the trick. Additionally you can randomly emboss a few bricks by carefully burnishing them from the back. Just a dozen bricks across an entire wall will do. (see illust) You can try the same technique with corrugated metal sheets. Embossed rivets and nail holes have a party.
Ok, let’s get serious and make a couple of walls. We are going to do a bit of everything. Let’s start with the simplest technique. Starting with a printed clapboard wall piece, print three of them. The first will act as our base guide and substructure. We will align and glue our layers to this. Cut out the window and door and with your gray marker, touch up the papers bare white edges. On the next two sheets we are going to cut out alternating clapboards, leaving just a bit extra paper along the top of each. Start at the bottom of the wall and work your way up slightly overlapping each layer of siding. Don’t forget to gray the edge of each board with your marker. Some where in here you will experience what I call the “Oh! Yeah” moment. The light bulb over your head clicks on and you catch yourself saying Oh! Yeah. This paper stuff is pretty cool.
Once you have finished planking this wall we can move on to the window and door. You will now have several pieces of printed windows and doors and we will use most of them. Window mullions, to cut them out or not. The truth is I rarely do this but since we are only dealing with one simple window, let’s go the extra step. Cut one of the windows free from the surrounding card. Leave a quarter to a half of an inch of paper surrounding it to aid in handling. Now remember the pin trick I mentioned earlier? Let’s use it now. Pierce the paper cleanly at the inside corners of the printed glass pains. With a fresh blade and a steel straight edge
Carefully cut out the glass in the top window frame. Do the same for the bottom frame.
Touch up the edges from the back. At this point you could glaze the windows. I like to use the glassine windows from salvaged business envelopes. The material is translucent rather then transparent. Not many industrial windows are perfectly clear after all. It’s a good idea to put off the glazing until after you dull coat the wall. It’s my preference to back up this whole assembly with another layer of printed window. You see things are getting quite thick and substantial for something made of paper. (see illust)
Using the extra paper you left on the window, glue the whole thing into place from the back of the layered wall. Now just one or two layers of window frame added to the front and you will have one of the best looking model windows you have ever seen. It was a bit of work but you made it with your own hands and you deserve that warm feeling of pride and accomplishment. The door goes together in much the same way. Be sure to add a layer for the hinges and door plate.
You have now done all of the basic techniques used in card modeling.
OK, off the soap box. I’ve said most of this befor with the exception of a few thing learned recently. thats the point. there’s always things to learn. Be open, be creative, be brave, have fun.


 Thom
Thom


